
Certificate in ACI
- Mukesh Chanderia

- Nov 13, 2023
- 2 min read
Updated: Apr 29, 2025
Steps to Install Certificate in APIC
1) Download root & intermediate CA certificate.
2) Open root CA certificate in notepad and copy the content.
3) Navigate to Admin > AAA Security
4) In the Work pane, choose Public Key Management > Certificate Authorities > Create Certificate Authority
5) In the Certificate Chain field, copy the intermediate and root certificates for the certificate authority that will sign the Certificate Signing Request (CSR) for the Cisco APIC.

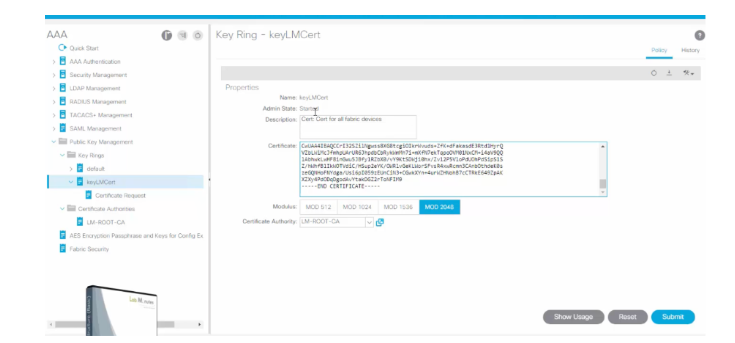
6) In the Navigation pane, choose Public Key Management > Key Rings.
7)Actions > Create Key Ring with “Root-CA”

8) Create CSR


9) Copy the CSR and give it to CA to give a certificate.
10) When CA gives cert then again copy the content of certificate.
11) And use it in key ring
12) Now go to POD policies to apply this key chain

Steps to Configure HTTPS Certificates on Cisco APIC GUI
Import the CA Root or Intermediate Certificate
Navigate to: Admin > AAA > Security > Public Key Management > Certificate Authorities.
Import the complete certificate chain, including the root and any intermediate certificates.
Create a Key Ring
Go to: Admin > AAA > Security > Public Key Management > Key Rings.
Define a name, select the appropriate certificate authority, and choose the desired key strength.
If generating a Certificate Signing Request (CSR) within APIC, leave the certificate and private key fields empty.
Generate a Private Key and CSR
Within the Key Ring, generate a CSR by providing the Subject (Common Name) and Subject Alternative Names (SANs), which can include DNS names and/or IP addresses.
Submit the CSR to your Certificate Authority (CA) for signing.
Import the Signed Certificate
Once you receive the signed certificate from the CA, import it into the corresponding Key Ring.
Ensure the certificate is in the correct format:
-----BEGIN CERTIFICATE-----
[Certificate Content]
-----END CERTIFICATE-----
Apply the Certificate to the Management Access Policy
Navigate to: Fabric > Fabric Policies > Policies > Pod > Management Access > Default.
Select the newly created Key Ring in the Admin KeyRing dropdown.
Click Submit to apply the changes.
Verify the Certificate
Access the APIC GUI via HTTPS.
Inspect the certificate details in your browser to confirm it's the CA-signed certificate.
Important Considerations
Self-Signed Certificates: By default, APIC uses a self-signed certificate valid for 1000 days, which automatically renews one month before expiration.
Certificate Format: Ensure that the certificate chain is correctly formatted, especially when dealing with intermediate certificates.
SAN Requirements: Modern browsers require the use of Subject Alternative Names (SANs) in certificates. Ensure all relevant DNS names and IP addresses are included.
Maintenance Window: Applying a new certificate will restart the HTTPS service on the APIC, potentially causing temporary GUI inaccessibility. It's advisable to perform this operation during a maintenance window.
Certificate Size Limit: The APIC GUI accepts certificates up to 4KB in size.
Reference
Comments